REVIEW · RIO DE JANEIRO
Rio de Janeiro: Paragliding Tandem Flight
Book on GetYourGuide →Operated by Rio Hang Gliding · Bookable on GetYourGuide
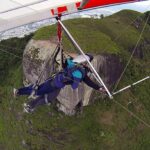
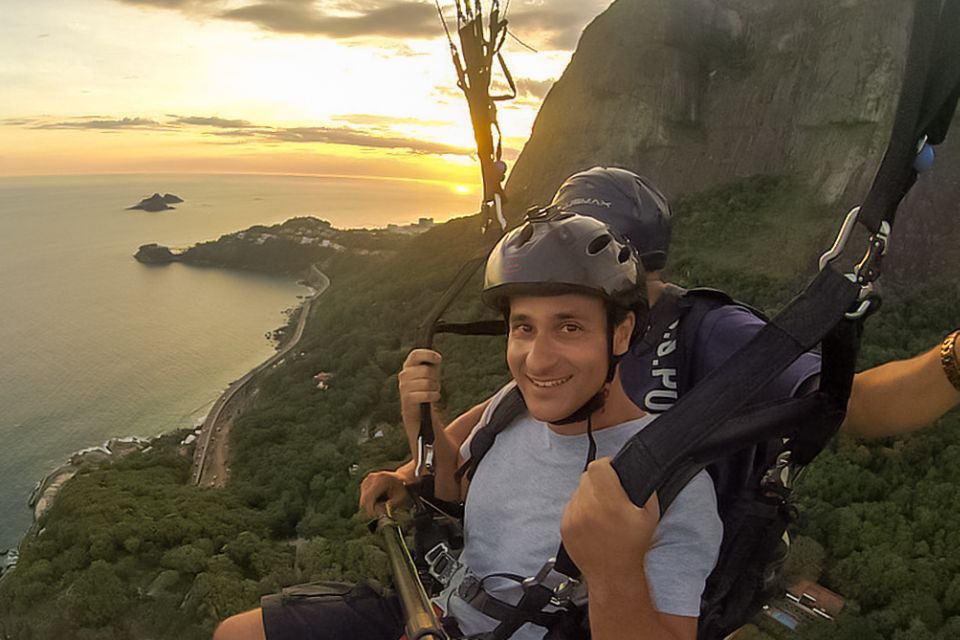
Floating over Rio feels unreal. In one smooth, non-motorized experience, you’ll run off Pedra Bonita and glide toward the coast with panoramic views that are hard to copy from anywhere else in town. I especially like that the flight is paired with real instruction from tandem pilots and a landing that keeps the whole thing calm and controlled.
What I love most is the take-off simplicity: you get a briefing on the procedure, then your pilot handles the hard parts while you focus on staying relaxed. I also like the practical extras, like transport to the launch site and an included video taken during your flight. One drawback to plan for: weather can delay your slot, so you may wait around at the mountain if wind or clouds don’t cooperate.
In This Review
- Key Points Before You Go
- Where You Fly: Pedra Bonita to São Conrado Beach
- The Pre-Flight Briefing and Gear Check That Lowers the Adrenaline
- Language help you can count on
- The Take-Off Run: What It Feels Like When You Go Off the Edge
- Cruising Over Rio: Landmarks, Tropical Birds, and the Wind Factor
- Timing can shift with meteorology
- Landing at São Conrado Beach: A Smooth Finish You Can Actually Enjoy
- Video Included vs. Extra Video You Might Want to Buy
- Price and Real Costs: Is $219 Good Value?
- Where the $219 actually earns its keep
- Where to Meet (and How to Avoid Getting Stuck Waiting)
- Who Should Book This Flight (and Who Should Skip It)
- Tips to Prepare: Shoes, IDs, and Weather That Can Change Everything
- Expect a wait sometimes
- Should You Book This Rio Paragliding Tandem Flight?
- FAQ
- What is included in the price?
- What extra costs should I expect?
- How long does the experience take?
- Where do I meet the guide?
- What should I bring and wear?
- Is the video included, and can I buy more?
Key Points Before You Go
- Pedra Bonita (525 meters): that clean cliff edge start is the moment the trip clicks from scary to magical.
- Tandem instruction first: you’re briefed on take-off and what to do mid-flight, not just strapped in and sent.
- Rio coastline views plus birds: expect open-air gliding sounds and the kind of quiet you only get without an engine.
- Landing at São Conrado Beach: a smooth finish where the experience turns into an actual stroll by the water.
- Included video isn’t unlimited: front-camera footage is included, while side-camera video costs extra.
- Small group feel: you’re not stuck in a crowd, and the process stays personal.
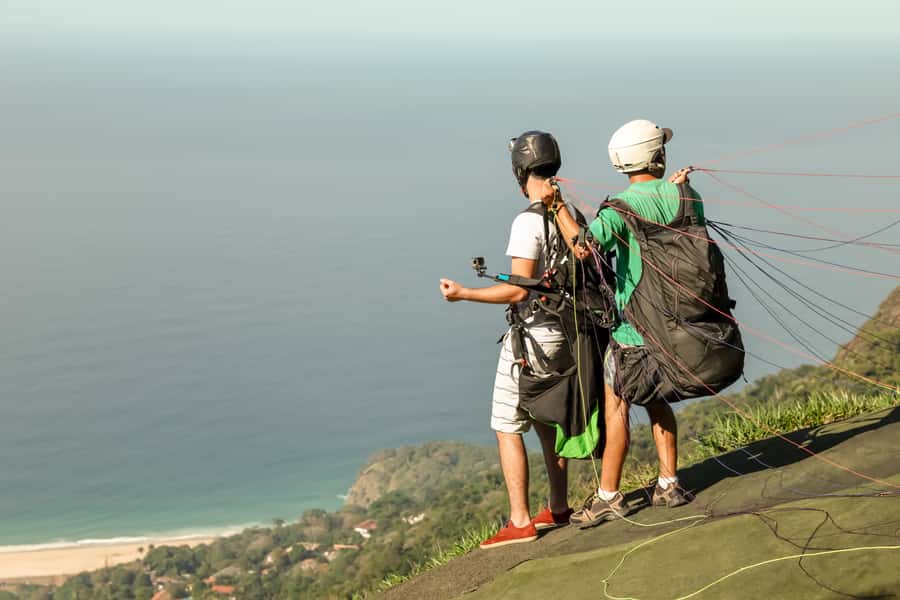
Where You Fly: Pedra Bonita to São Conrado Beach
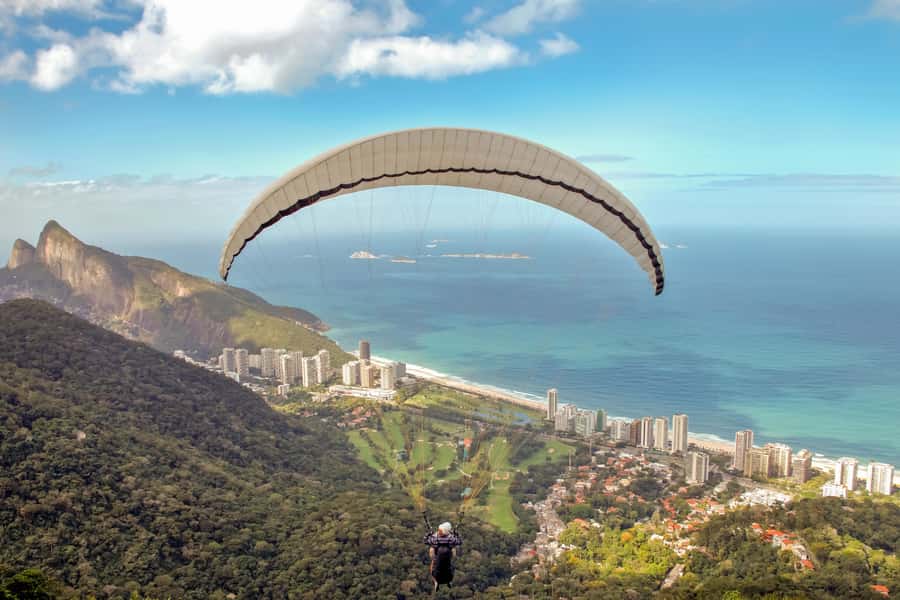
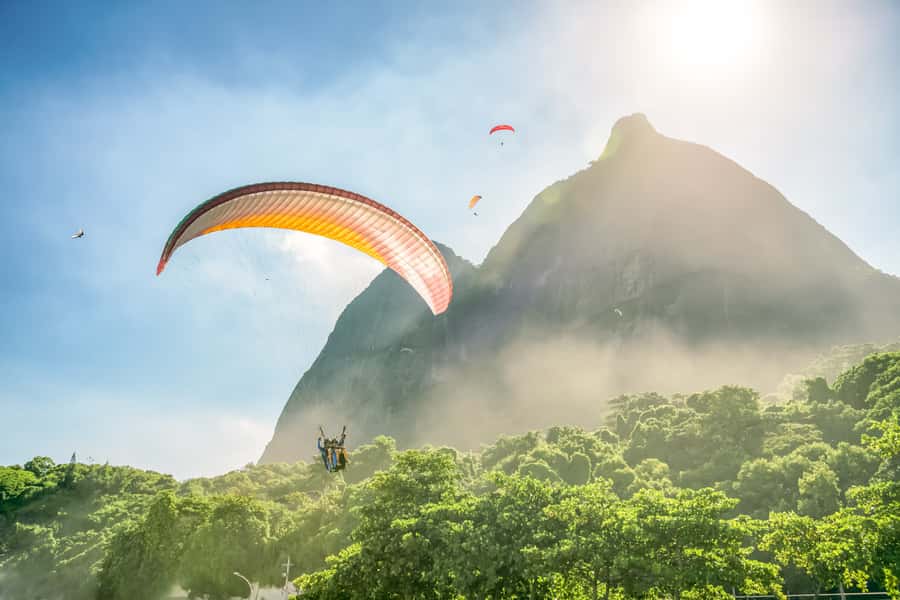
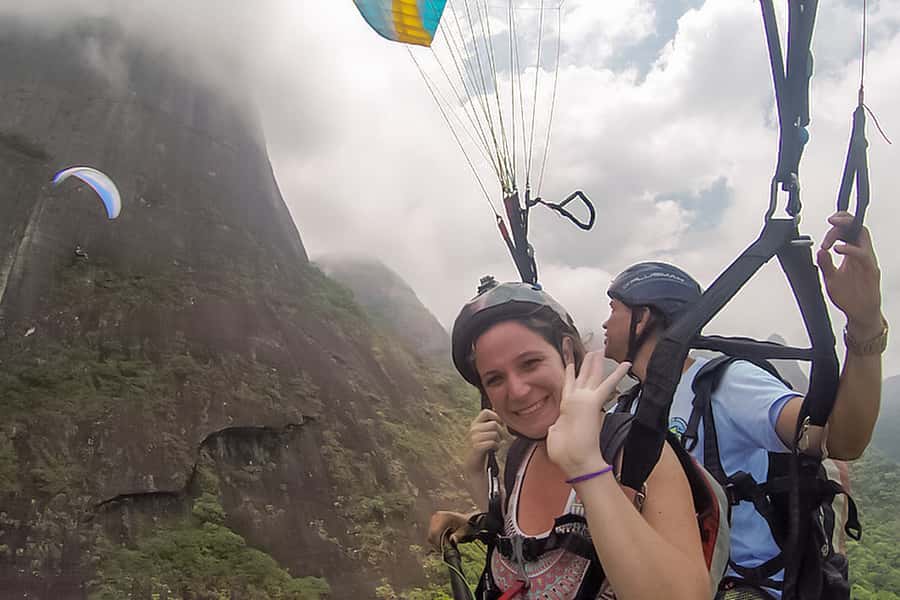
This paragliding tandem outing is built around one iconic profile of Rio. You start on the mountain at Pedra Bonita, then launch and glide down toward São Conrado Beach for a smooth landing. The whole route matters because Rio’s geography makes the views instantly “Rio”: ocean on one side, mountains on the other, and city shapes far enough away to feel airy rather than chaotic.
You’ll feel the difference between “looking at Rio” and “moving through Rio.” From above, landmarks read like geometry—coastlines, ridgelines, and the way the city spreads—while the open-air seating keeps you aware of wind, sound, and speed. That sensory mix is the point.
You can also read our reviews of more tours and experiences in Rio De Janeiro.


The Pre-Flight Briefing and Gear Check That Lowers the Adrenaline
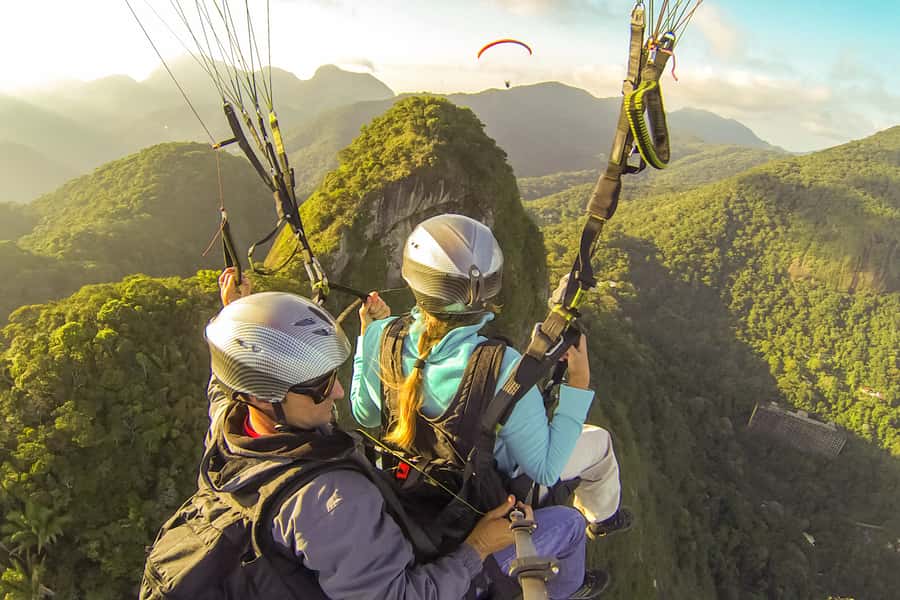
Before you’re anywhere near the edge, you get a short briefing from the tandem pilots. You’ll cover the take-off procedure and the basics of what to expect during flight, which is where most first-timers get their confidence back. You don’t need to know how paragliding works; you do need to know your part in the run-off and how to stay steady.
Then comes harness and safety equipment. It’s not just “equipment exists,” either—you’ll see how your position works and how your pilot intends to manage the flight. If you’re used to active tours where you chase instructions, this feels different: it’s structured, calm, and designed to make the next step feel obvious rather than risky.
Language help you can count on
The instruction is offered in Portuguese, English, and Spanish. That matters in real terms: you’re much more likely to feel relaxed if you can follow the take-off cues without guessing.
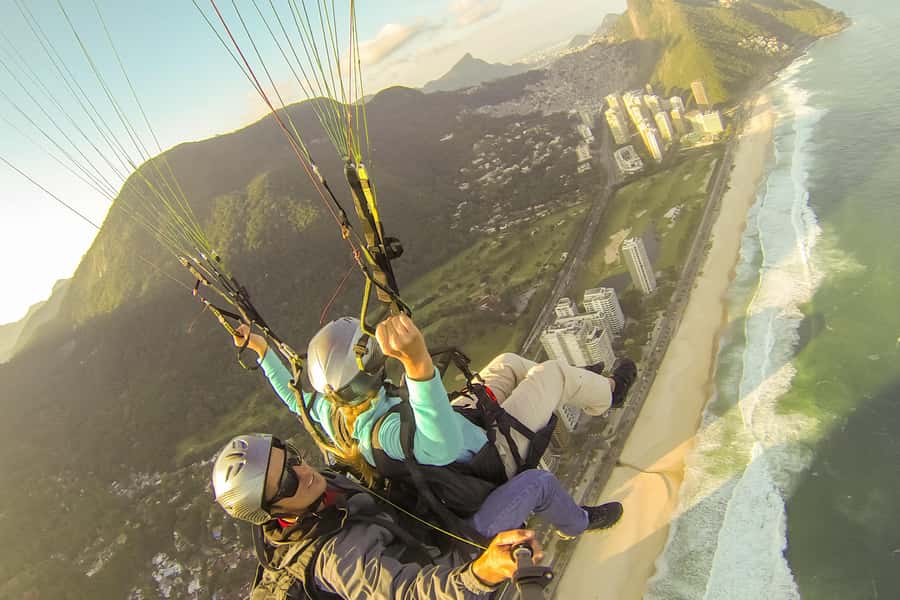
The Take-Off Run: What It Feels Like When You Go Off the Edge
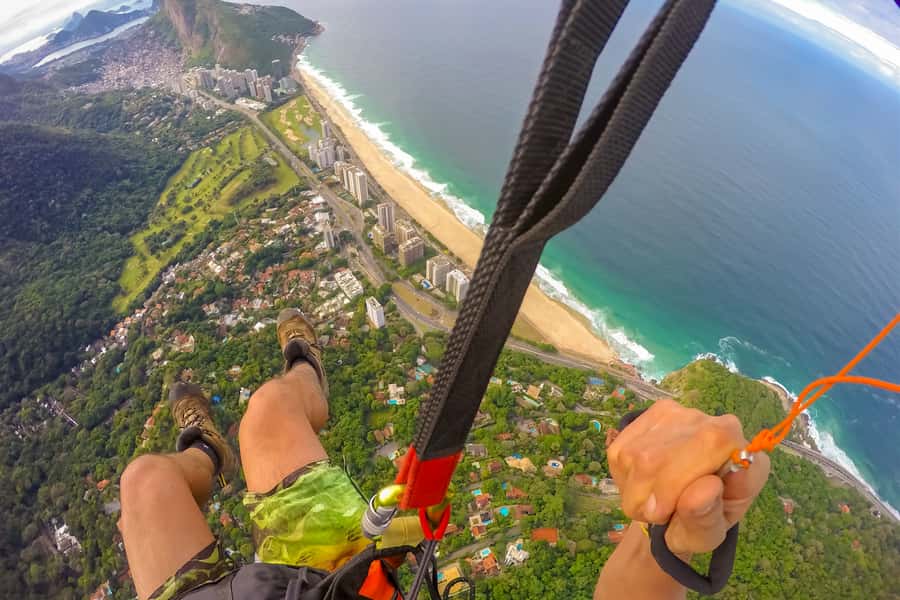
The moment of truth is the run straight off the 525-meter (1,700-foot) Pedra Bonita mountain. You’ll likely feel nerves right before it happens—this is normal—but your job is simple: follow your pilot’s direction and commit to the run. Once you’re airborne, the fear often evaporates fast, replaced by that strange, quiet calm that only happens when you’re gliding and not fighting engine noise.
A practical note: you must wear comfortable shoes that you can sprint in and that won’t slip off during your flight. No sandals or flip-flops. This is not a fashion choice; it’s the difference between steady confidence and a last-minute worry.
Cruising Over Rio: Landmarks, Tropical Birds, and the Wind Factor
Once you launch, your pilot guides you through the air with a smooth, non-motorized glide. This is where the experience turns into something you’ll remember with your body as much as your eyes. You’ll feel the wind through the open-air setup and hear natural sounds—especially the tropical birds as you move through the sky.
You’ll also get incredible panoramic views of Rio. While exact sightlines vary by conditions, the vibe is consistent: you see Rio’s shapes from angles you can’t reach by bus or viewpoint. That’s why it’s worth planning around this activity even if you’ve already done a couple of “lookouts” during your trip.


Timing can shift with meteorology
Paragliding depends on wind and weather. Your flight can be delayed or rescheduled if conditions aren’t suitable. Some people wait longer than planned due to wind—so build in buffer time on that day. If you’re on a tight schedule, treat this like a “half-day anchor” rather than a quick morning add-on.
Landing at São Conrado Beach: A Smooth Finish You Can Actually Enjoy
After enjoying the views, you land smoothly on São Conrado Beach. This is one of the smartest parts of the experience because it turns your adrenaline into an easy transition: you’re already at a place where you can stand up, breathe, and take in the coastline at ground level.
You’ll also receive the exclusive video taken during your adventure. That matters because a flight can be hard to describe afterward—you’ll want something you can replay with the context of what you felt up there.
Video Included vs. Extra Video You Might Want to Buy
The included footage is the “front camera” video from your flight. You’ll get it as part of the experience, which is a big help for sharing at home without needing to guess your angle or motion.
There’s a catch: if you want more than the front view, you can usually purchase additional footage, like a side-camera option. One clear detail here: the side camera video can be bought for an extra 200 Brazilian Reais (R$). If you’re the type who loves multiple angles—especially for group trips—plan for that budget.
Also, because it’s taken during your flight, the video has a different feel than phone footage. You’re watching your pilot’s perspective of the air, not trying to stabilize your own camera while floating.
Price and Real Costs: Is $219 Good Value?
The listed price is $219 per person, and that’s a reasonable number for a tandem flight in a place that offers genuinely iconic aerial scenery. But the real value question is: what extra costs might show up on the day?
Two things are not included:
- Flight insurance
- A launch usage fee of 120 Brazilian Reais, typically paid in cash. If you pay by card, there’s a 10% fee, and it’s charged by the local hang gliding club.
So yes, factor in the launch fee. About US$20 is a helpful reference, but the key is how you’ll pay it. Bring cash if you can, or plan for the card surcharge if you can’t.
Where the $219 actually earns its keep
You’re not just paying for a thrill. You’re paying for:
- tandem instruction
- harness and safety gear
- transport from the meeting point to the launch site
- and the included video that makes the experience shareable
For first-timers, that instruction and equipment piece is where the value lives. The views are spectacular, but the safety-first setup is what lets you relax enough to enjoy them.
Where to Meet (and How to Avoid Getting Stuck Waiting)

Meet your guide in front of the Hortifrutti Grocery Store. That’s your anchor point before transport to the launch site. If you choose pickup, you’ll be told the time and should wait outside the building for last-minute contact.
If you’re doing this without pickup, taxis and local rides can get you to the meeting point, and it’s the most straightforward way to stay flexible. Just know that transport to the launch site is included, but return transfers after the activity are not necessarily included unless pickup/drop-off was selected.
If you want a smooth day, I’d treat it like this: arrive on time, check in, then let the crew manage the mountain logistics.
Who Should Book This Flight (and Who Should Skip It)

This activity is best for people who want a “wow” view without needing to learn a sport first. You’ll be suited to the experience if:
- you can follow the take-off procedure
- you can run a short sprint safely in your shoes
- you’re comfortable in an open-air setup
It’s not suitable for:
- children under 14
- unaccompanied minors (minors under 18 must be with a legal guardian, with picture IDs of both)
- people with mobility impairments or wheelchair users
- anyone over 264 lbs (120 kg)
Seniors can fly if they’re capable of following the take-off procedure. So the real question isn’t age; it’s whether you can do that run and remain steady as you go over the edge.
Tips to Prepare: Shoes, IDs, and Weather That Can Change Everything
Bring:
- Passport or ID card
- comfortable shoes you can sprint in
Wear:
- closed-toe, secure footwear
- no sandals or flip-flops
On cooler winter days, bring a sweatshirt. That’s not about style; it’s about not feeling chilled during waiting or while you’re suited up on the mountain.
Expect a wait sometimes
Because the flight depends on meteorological conditions, it’s smart to plan your day so you’re not rushing to another timed activity. When wind isn’t ready, you’ll likely wait at the launch area until the pilots can make the call.
Should You Book This Rio Paragliding Tandem Flight?
I’d book it if you want one of Rio’s most memorable experiences that still feels safe, instructional, and grounded in real pilots. If you’re a first-timer, the tandem format is exactly the right move because the experience is designed to turn fear into calm once you’re in the air.
I’d hesitate only if:
- you’re extremely time-constrained (delays can happen)
- you’re worried about the take-off run and shoe requirements
- you’d be upset by extra onsite costs like the launch usage fee or optional video add-ons
If you show up with good shoes, a clear schedule buffer, and the right payment plan for the launch fee, you’ll likely come away with that rare travel memory: the sky view and the quiet feeling that’s hard to fake on land.
FAQ
What is included in the price?
The price includes the tandem paragliding flight with an instructor, harness and safety equipment, and transport from the meeting point to the launch site. You’ll also receive an exclusive video taken during your flight (front camera).
What extra costs should I expect?
You should plan for flight insurance (not included) and a launch usage fee of 120 Brazilian Reais, paid in cash. Cards add a 10% fee, charged by the local hang gliding club.
How long does the experience take?
Plan for about 2 to 3 hours total. This includes briefing and the time needed based on meteorological conditions.
Where do I meet the guide?
Meet your guide in front of the Hortifrutti Grocery Store.
What should I bring and wear?
Bring a passport or ID card and wear comfortable shoes suitable for a short take-off sprint. Sandals or flip-flops are not allowed.
Is the video included, and can I buy more?
Yes, the activity includes the exclusive front-camera video. A side-camera video can be purchased for an additional 200 R$.